
Avoid a burst water pipe with these easy tips
When spring arrives, many of us get excited to start enjoying our outdoor spaces again. However, in the process of prepping their yards, some homeowners turn on their outside faucets for the first time of the year only to discover little or no water coming out. This may be a sign of a ruptured pipe, which means the “missing” water could instead be streaming into the drywall inside of the home.
If you’ve ever experienced a water escape issue, you know how much of a headache it can be. Not only can water spew uncontrollably, it may also lead to significant water damage if not addressed promptly. Fortunately, there are measures you can take to avoid this scenario and enjoy the milder temperatures during the spring thaw.
What causes water pipes to rupture?
As Canadians we are no strangers to chilly winters – and the plunging temperatures may lead to trapped water freezing in your hose bib line. The hose bib is the faucet (also known as a spigot) on the outside wall of your house that lets you access running water outdoors. When water gets trapped in there and freezes, it can wreak havoc on the pipe system leading into your home.
A rupture in the plumbing may go unnoticed at first, allowing water to leak into areas you don’t typically see. Water can seep into your walls, floors, and crawl spaces, causing extensive damage that can be difficult to repair. In some cases, water damage can also lead to mould growth, posing serious health risks.
But there’s good news: keeping your outdoor water faucet in good condition is relatively easy.
First things first – be proactive
By taking preventative measures ahead of the seasonal freeze, you can avoid the implications of a ruptured hose bib and enjoy the convenience of your outdoor faucet. We recommend you do the following before winter hits:
- Remove your garden hose from the hose bib (faucet) so any trapped water can drain properly.
- Shut off the water source* to your outdoor faucet, then open the outdoor handle to drain any remaining water out of the pipe.
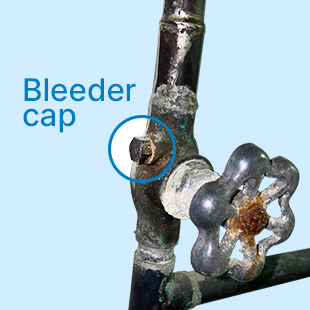
- Locate and open the drain/bleeder cap in the plumbing leading to your outside faucet (see photo – this is a little knob on the side of the pipe). Opening it will drain any water remaining in the line. Be sure to have a bucket handy to catch the water.
- Close the bleeder cap.
- Turn off your outside faucet.
*If you don’t have the ability to shut off the water, ensure you have a frost-free hose bib. If you don’t know what type of hose bib you have, contact a professional plumber to make sure your setup is winter-friendly.
Related: 16 things any homeowner can tackle to prepare for winter
Take action when spring is near
If you’re new to homeownership or are unfamiliar with your outdoor plumbing, we recommend reaching out to a qualified contractor to help you address these steps.
- Make sure your exterior faucet is off (closed) by turning it all the way clockwise.
- Locate the inside water shut-off valve; specifically, the valve for the faucet. You may have separate shut-off valves if you have multiple outdoor faucets.
- Re-install the drain/bleeder cap if you had this removed or opened. This is usually found on the side of the pipe, close to the valve. Turn clockwise until shut (you may need pliers).
- Open the water shut-off valve to re-pressurize the line.
- Check for leaks around your water valve and drain/bleeder cap - if you see any water coming through this part of the pipe, turn off your water valve and call a plumber.
- If the piping to your exterior faucet is visible, inspect or listen for any leaks.
- Test your outdoor water tap and see if there are any leaks; turn the faucet on and ensure there is a steady flow of water.
- For peace of mind, check again for leaks around your water valve and the faucet after a few hours of use.
Related: Basement flooding: Tips to protect your home during the spring thaw
Though tackling maintenance chores can feel daunting, the effort is well worth the reward of avoiding stressful scenarios in your home. For additional protection, talk to your broker about additional water coverages available on your insurance policy.
Read next: How to create a water leak response plan – and why you need one